
Introduction
While I've worked hard to make game creation in Playscii as easy and inviting as possible, it's still code-based, and much of this page will assume you know the basics of Python programming. Any kind of non-code-based game creation, such as visual programming, is a far-off someday thing. If you have ideas for how it could work, I'm interested in hearing them.
That said, you can make cool things happen in Game Mode with small amounts of easy to understand code, and you can "live tune" many things without having to restart Playscii to see your changes. This page will explain how.
There are some topics best covered in this format, but for other things Playscii's code itself is the best documentation. Playscii can auto-generate nicely formatted HTML documentation of its code you can view in any web browser, without an internet connection. All you have to do is select "Generate documentation" from the Help menu. It may take a moment, but within a few seconds a table of contents page should open in your web browser. (If you're running from source instead of one of the pre-compiled builds, make sure you have the pdoc Python module installed.)
If you've already generated the docs, the following link should take you to there:
Playscii Auto-Generated Documentation
Table of Contents
- Introduction
- Entering Game Mode
- Menu Bar
- Loading Games
- Creating a New Project / Folder Structure of a Game
- Game World Overview
- Game Object Overview
- Game States
- the Editor Interface
- the Properties Editor
- Spawning New Object Instances
- Object State and Facing
- World Properties and Globals
- Camera
- Rooms
- HUD
- Debug Views
- Collision Detection and Resolution
- Sound and Music Playback
- Handling Input
- the Developer Console
- Crash/Error Handling
- Workflow
- Tour of Example Games
Entering Game Mode
By default Playscii launches into Art Mode. To switch between Art Mode and Game Mode, click the top right corner of the screen, or press G.
Menu Bar
The menu bar along the top edge of the screen provides access to much of Playscii's functionality. Click a menu name to open it and select from the available commands. Many commands have an associated keyboard shortcut, displayed to the right of the menu entry.

Loading Games
Games in Playscii are folders that contain code and assets (art, sounds) in specific subfolders. Playscii includes some games in its application folder, but your operating system's Documents/Playscii/ folder has a games/ subfolder for you to put your own games in.
You can launch a game in Playscii in one of three ways:
- "Open game" from the Game menu will bring up a list of available games. Load one by clicking on it.
- Launch Playscii from the command line with -game mygame after it, where mygame is the game (ie the folder) you want to launch.
- Include a file called autoplay_this_game in the same folder as the Playscii executable, whose first line is the name of the game you want to load. This is a simple hack for distributing games to people who don't have Playscii - you can just zip up the folder and distribute that.
Creating a New Project / Folder Structure of a Game
You can start a new project with "New game" from the Game menu, and Playscii will create the appropriate folders for you:
- art/ - PSCI art files used by your GameObjects go here.
- charsets/ - If your game uses any custom character sets, put them here.
- palettes/ - If your game uses any custom color palettes, put them here.
- scripts/ - All Python scripts (.py extension) for your game go here. Playscii will create a generic "starter script" here, which may be helpful if you're new to writing Python scripts for game objects.
- sounds/ - Sound effects and music for your game, in any format supported by SDL2_mixer, go here.
- start.gs - This is the default game state save file that will be loaded when you open your game.
When you create a new project, Playscii automatically creates a generic "starter script" in the scripts/ folder, with a few things to help newcomers - if you already know what you're doing, you can delete or ignore it. This starter script defines two new "classes", or flavors, of game objects: a generic GameObject subclass and a subclass of Player, which is simply a GameObject that moves around when you press the arrow keys. Before getting too deeply into these, though, a higher level overview of how all the classes fit together is in order.
Game World Overview
In Game Mode, Playscii delegates game functionality to something called a GameWorld: loading game states, content, and scripts; managing the spawning and lifetimes of GameObjects; running much of the input->update->render loop that makes the simulation go; and handling Edit UI tasks such as selecting and dragging objects.
GameObjects are, in turn, most of what a GameWorld thinks about. A GameObject can represent the player, a non-player character, an entire screen of level geometry, a powerup, a trigger that does something when entered, an invisible marker where another object appears, and so on.
GameWorlds can also organize their objects into GameRooms, so that only certain objects are visible and simulated at once, and can use a GameHUD to render UI-appropriate information above everything else.
The GameWorld class also has some functions that are most appropriate to its scope, such as managing music playback, getting collections of objects by type, and global collision tests. Have a look at the GameWorld generated documentation for an idea of what it handles relative to the other moving parts.
Game Object Overview
The GameObject class defined in the built-in game_object.py module provides the base capabilities of all objects, and you can extend this functionality by creating variants of that base class in the scripts you place in the game's scripts/ subfolder. The game_util_objects.py module includes a few generic subclasses ready-made for things like the player, projectiles, NPCs, triggers, and spawners.
Every GameObject has two components that help it render (draw to the screen) and collide, respectively: a Renderable and a Collideable. Renderables in turn can draw data from one or more Arts, pieces of art you can create in Art Mode or generate on-the-fly with code.
GameObjects have many properties you can change, functions you can call and/or override, and concepts such as state and facing to let you define custom behaviors. Rather than try to detail all of them here, please have a look at the GameObject generated documentation and Game Object Utility Library generated documentation, as well as the code for the example games, for an idea of how these can be used.
Game States
Playscii can save the state of all objects in a GameWorld into a "save state file" not unlike a conventional savegame or save state in a game console emulator. The start.gs created with a new project defines the game's starting state, which you can modify how you like by adding and manipulating the objects therein. You can create additional save state files for testing purposes, or even to load in new segments of gameplay if there is no state carried over from previous segments.
Save a game's current state into a new state file with "Save new state..." from the State menu. "Save state" or Control-S saves over the last saved state - take care not to accidentally overwrite your start.gs with this - and "Load state" opens a list of save state files to choose from. F2 quickly reloads the last loaded state file, which is handy for rapid iteration.
Much as Art (.PSCI files) are just tiles, layers, and frames serialized into JSON, save state files are all the GameObjects and GameRooms serialized into JSON, so it's possible to view and even manually edit them, though there's no non-bug reason you'd need to do this.
It's worth noting that all GameObjects with the should_save property set False do not get saved into state save files. This is appropriate for certain kinds of objects, such as projectiles or spawned enemies whose lifetimes are managed in some other way, and/or for whom saving and loading would introduce unwanted complexity into how they work.
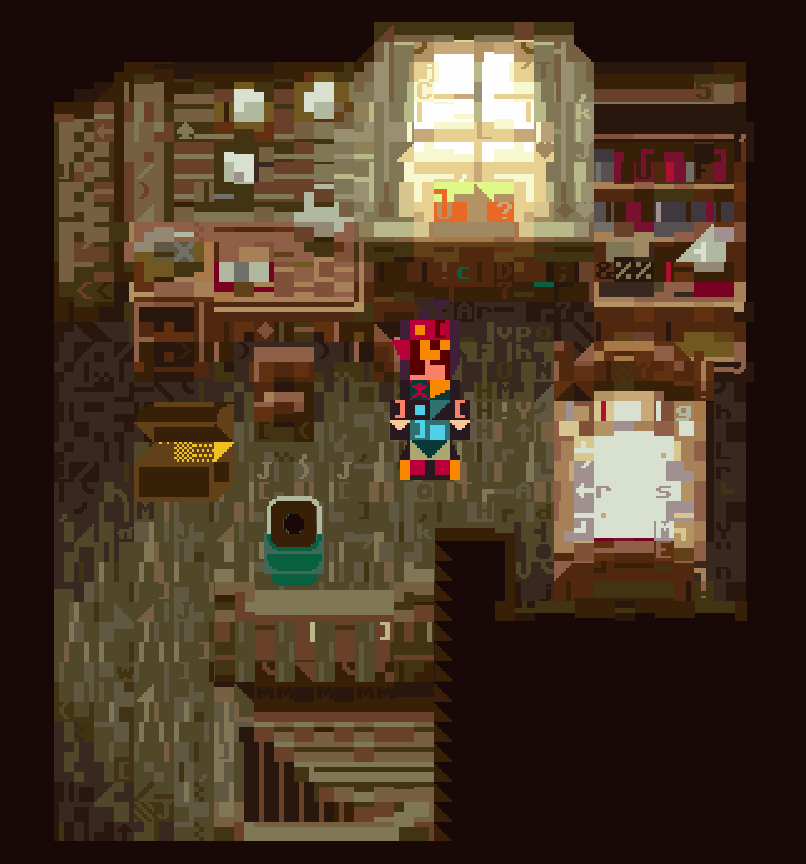
the Editor Interface
In Game Mode, the boundary between editing a game and playing it is intentionally fairly thin. The editor interface lets you create, manage, and modify GameObjects, and when this interface is disabled you're left with just the game itself, ie what players experience.
You can hide this UI at any time with "Hide edit UI" in the Game menu or Shift-E. When distributing games, you can add the line Application.can_edit = False to playscii.cfg which will prevent players from using the interface, switching into Art Mode, or doing anything besides just what you as a the game's designer intend.
The most basic actions one can do in this edit UI are primary mouse button on an object to select it and drag to move it. Selected objects have a thin pulsing outline that shows their "bounds", ie the edges of their current Art. Similar to Art Mode's Select tool, you can select multiple objcets at once: Shift + primary mouse button adds an object to the current selection set, while Control + primary mouse button removes an object from the selection set.
You can also select from a list of all objects in the world with "Select objects" in the Object menu, or Control-L. The aforementioned modifier keys have the same effect here as when you click in the world.
Selected objects will drag-move together as expected. You can also delete all selected objects with "Delete selected objects" in the Object menu.
the Properties Editor
The pane that appears on the right side of the screen when you have object(s) selected is the Properties Editor. It shows the properties on the selected object(s) that you're allowed to edit on a per-instance basis. Clicking on a property will bring up a window where you can enter its new value. If multiple selected objects have different values, this will be displayed in the property field instead of any single value.
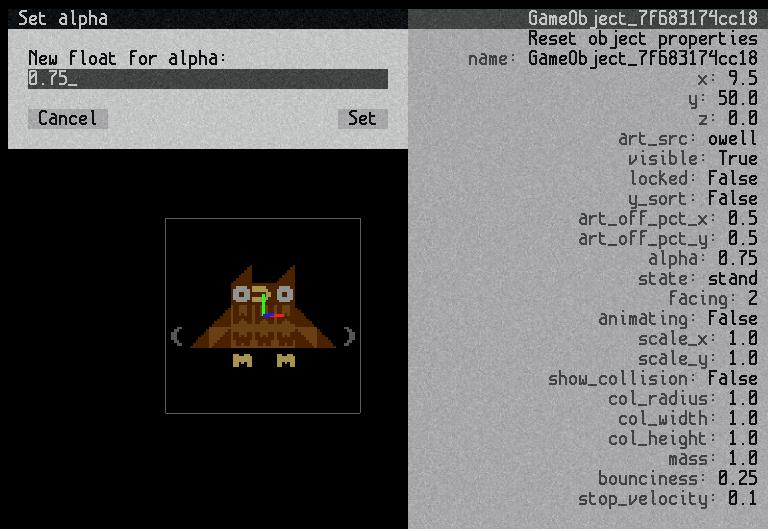
The properties you edit in this UI are the very same properties that are declared in the object's class definition. If you want to change a value for all instances of this class, edit the code; if you want to change the value for a single instance, use the Properties Editor.
Each class defines which of its properties can be edited, and which will be saved to state files. The serialized property is a list of string names of properties that will be saved and can be edited, while the editable property is a list of string names of properties that should be editable but not serialized - mainly useful for live tuning.
Spawning New Object Instances
You can create new instances of the classes you've defined in scripts with "Spawn object" in the Object menu, or Control-P. This will bring up a list of available classes. Click one to select it, and then click in the main view to spawn an object at that location.
You can also create new objects from existing ones with "Duplicate selected objects" in the Object menu.
Object State and Facing
In almost any game that uses 2D artwork, different sprites and animations are used to represent an object's different states (standing, walking, jumping) and facings (left, front, back). GameObjects use a string variable called state and an integer called facing (with GOF_LEFT, GOF_RIGHT, GOF_FRONT, GOF_BACK as the possible values) for these.
Object State
GameObject.state can be any string, but the default state name is "stand". There is no setter method for state, you can just set it, get it, and compare it directly.
Any custom state names you define for a class need to be included in its valid_states list. The get_art_for_state get_art_for_state methods use this list to load and find state-appropriate art, respectively. When a GameObject's state_changes_art property is set True, its art_src value becomes a prefix for finding art filenames for the appropriate state, eg "player_stand", "monster_die" etc. When state_changes_art is False, the base art_src property is used and the object won't change its art unless you have custom code doing so.
Object Facing
Similar to the above, when an object's facing_changes_art property is True then get_art_for_state will try to return an art that is appropriate to both the object's current state and its art. The cronotest example game shows this in action: "crono_stand_front" is the art for the player standing (ie not moving) and facing to the front, while "crono_walk_right" is the art for the player walking to the right.
Unique left and right facings will be used if found, otherwise get_art_for_state will mirror the one it finds so you don't need to make extra art. In general, the system will fall back to whatever facing is available, so that if you're just roughing in an object quickly you can get away with just having a front or side-facing art and do the other assets later.
World Properties and Globals
GameWorld is a core Playscii class, and it is a singleton not a GameObject: it doesn't serialize itself, nor is it an appropriate place for game-specific logic. In addition to classes like Player and Projectile, the game_util_objects.py module has two special classes that enable you to manage the world's state as objects: WorldPropertiesObject and WorldGlobalsObject.
Every GameWorld has a WorldPropertiesObject, but it's given a few status flags that ensure you can't select it, delete it, or spawn a second instance. Its purpose is to mirror the properties of the world itself, and then propagate those back to the world when loading a state, so that you can edit the world's properties much as you would any other object, with "Edit world properties" in the World menu. Here you can change things like the gravity applied to physical objects, whether or not the camera auto-locks on to the player, and various debug settings.
Every GameWorld also has a WorldGlobalsObject, which is typically a custom class defined for each game, where you can put logic that manages global state. When a save state file loads, it's spawned immediately after any saved objects, so whatever it's looking for is guaranteed to be there. Other game objects can always refer to it via self.world.globals.
By default this object isn't serialized, to keep a clear separation between world data and world logic, but this isn't carved in stone. The first released Playscii game, Endless Ladder Climbing 2, makes fairly heavy use of a WorldGlobalsObject to manage world state.
As WorldGlobalsObject is bound to be a custom class, you can let the world know which class to use by entering the class name in WorldPropertiesObject.globals_object_class_name.
Camera
A game's camera is not represented by a GameObject, rather its few properties are manipulated via the WorldPropertiesObject (so its position at any given point is serialized in a save state file) or script code.
In addition to static positioning, a camera can have a "focus object" whose movement it tracks, set via Camera.focus_object. As a convenience, when GameWorld.player_camera_lock is True, the camera will try to stay locked on to the player.
As in Art Mode, you can manually set the camera's zoom level with "Set camera zoom" in the View menu, and you can set its position directly with the dev console.
It's sometimes useful to use a LocationMarker object to remember a camera position. "Move selected object(s) to camera" and "Move camera to selected object" in the View menu make it easier to do this: you can position the camera how you want it and then snap an object to it, and then later snap the camera to that object to restore the position.
Rooms can also set the camera position. This is explained in detail in the next section.
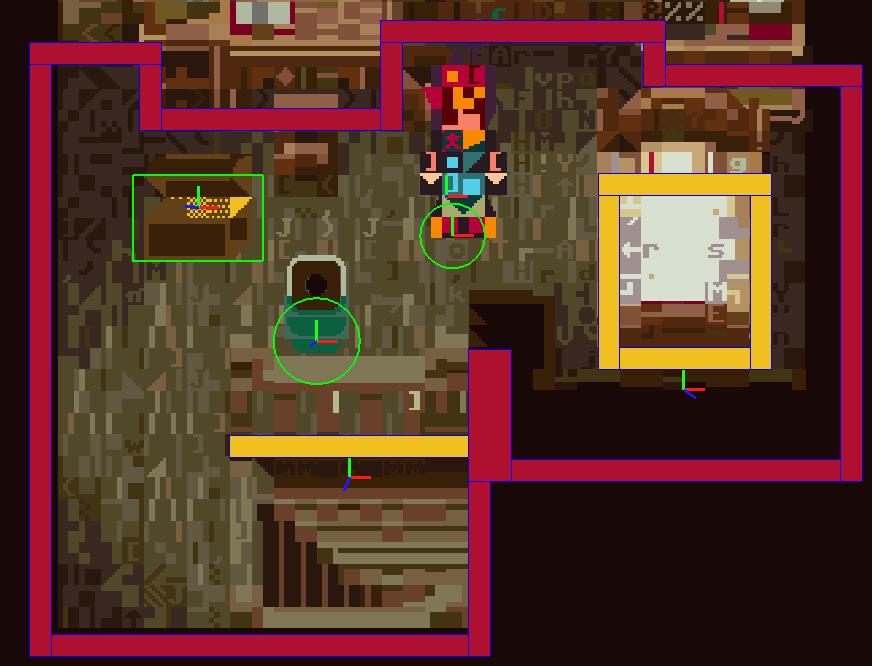
Rooms
Sometimes your game will have multiple "screens" worth of content, like a large world to explore. It's usually easier, for both the designer and the computer, to not be thinking about every single object in such a world at all times. To this end, Playscii allows you to organize objects into Rooms, represented by the GameRoom class.
Rooms are strictly an opt-in concept: every object keeps track of which rooms it's in, and an object that is not in any rooms is considered to be everywhere. So by default the world updates and renders every object in it, and you don't need to think about rooms at all if you're not using them. Most of the example games don't use rooms at all, while the Maze game uses them extensively. If you've got Playscii open as you read these docs, opening the Maze game and poking at it might help you understand some of the functionality.
The game world has a notion of what the "current room" is, and by default it's None. Once you've created a room, with "Add room" in the Room menu, you can set it as current either with "Change current room" from the Room menu, or clicking on a room's name in the list at the bottom of that same menu - a checkmark will appear next to the current room.
Managing Room Contents
Once you have a room set as current, you can set which objects are in it with "Add selected objects to this room" and "Remove selected objects from this room". "Add/remove objects from this room" will bring up a list in the left pane, in which objects in the room are highlighted and clicking adds or removes them. On the code side, if you have a handle to the room itself you can do this with GameRoom.add_object_by_name (passing the object's string name), GameRoom.add_object (passing the object by reference), GameRoom.remove_object_by_name, and so on.
Again, objects that you know will always be on-screen - it's usually a safe bet that the player is, for example - can be kept outside of all rooms.
Objects that are not in the current room (and aren't "everywhere" as described above) are not rendered or updated (unless their GameObject.update_if_outside_room property is set True), so as you're organizing objects you'll see some of them blink out of sight.
If you get confused and what's where, you can toggle a global view of all objects in all rooms with "Show all rooms" in the Room menu.
Room Camera Markers and Edge Warps
Managing room transitions and camera changes as the player moves around are very common uses of rooms - again, the Maze game's explorable world does this a lot. If a room's camera_marker_name is set, the camera will warp there when the room is entered. You can easily set this with "Set this room's camera marker" in the Room menu.
Often you'll want to warp the player to a different room when they reach the "edge" of it. You need to provide two bits of information to the room to make this work: give it an object to define the "edges" of the room, with "Set this room's edge object" in the Room menu, and telling the world which room or point to warp to when the player reaches the north/south/east/west edges of those bounds, with "Set this room's edge warps". In the pane on the left, you'll notice you can select both room names and object names. If a room name is given for an edge warp, the player will warp to that room; if an object name is given, the player will warp to that object's location and change to that object's room.
Technically this "edge warp" functionality is doing something very similar to the WarpTrigger class, but its close integration with the room concept makes it somewhat easier.
A few more intricacies of Rooms are covered in the Maze game section below, so have a look if any of this isn't clear.
HUD
The GameHUD (HUD is short for Heads-Up Display) is a simple singleton member of GameWorld that draws in 2D screen space and manages its Renderables directly, useful for UI/HUD like purposes. The whole point of a GameHUD is that it has game-specific logic, so you'll want to create a subclass in your scripts and set your GameWorld.hud_class_name to its name via the WorldPropertiesObject, much as you set globals_object_class_name.
When you're setting Renderable sizes and locations in a GameHUD, remember that it uses OpenGL screen space coordinates, where (0,0) is the center of the screen and (1,1) is the top right corner.
Debug Views
Game Mode has a few visualization modes that are helpful for debugging in the View menu:
- Show all object origins: show each object's "origin" or XYZ location using a familiar red/green/blue axis marker.
- Show all object bounds: show each object's "bounds", ie the edges of their current Art.
- Show all object collision: show each object's collision shapes - see the Collision section below.
If you want to use debug lines for a more specific purpose, check out the renderable_line.DebugLineRenderable class - you can feed it a list of 3D coordinate tuples and it will draw those lines in the world.
Collision Detection and Resolution
Each GameObject has a Collideable component that allows it to participate in collisions with other objects. A Collideable in turn can have zero or more CollisionShapes, of which there are two types: Circle and Box (or "AABB" for Axis-Aligned Bounding Box, meaning an unrotated rectangle). Mostly commonly an object's Collideable will either have a single shape, as in the case of dynamic objects like the Player and Pickup classes, or multiple shapes arranged to approximate the shapes of tiles in an object's Art's "collision layer" - see more on this below.
Cronotest example game showing circle, box, and tile-based collision.
These basic collision types are represented in the CST_* enumerated values in the collision module: CST_NONE, CST_CIRCLE, CST_AABB, and CST_TILE. Set a GameObject's collision_shape_type property to one of these to get each behavior.
CST_NONE means a Collideable will not bother generating any shapes and effectively do nothing, CST_CIRCLE and CST_AABB refer to the circle and box shapes described above, and CST_TILE refers to the generation of multiple box shapes alluded to above. An object's Circle collision size can be tuned with the col_radius property, and an object's AABB collision size can be tuned with the col_width and col_height properties. If you enable the collision debug view, you can see these changes reflected in real time.
Tile-Based Collision
CST_TILE collision leverages Playscii's tile-based nature by letting you define a layer in an object's Art to be its "collision layer" - a layer whose name is defined in the GameObject.col_layer_name property - so that you can easily author collision for complex environment objects. By default any layer in an Art named "collision" will be used for this purpose, and any non-blank (character index 0) tile on that layer will be treated as a solid block. In the image above, you can see the red shapes with the blue outlines that define the background object's collision layer. Static background objects are the most common use case for tile-based collision
Static vs Dynamic Collision
A GameObject's collision can be static or dynamic. If it's static, it can never move. Objects with CST_TILE collision are always static, as Playscii does not currently have a computationally efficient way to handle complex tile-based collisions for moving objects. The CT_* enum values defined in the collision module define arbitrary categories, and CTG_STATIC and CTG_DYNAMIC are lists of these values. You probably won't have to check or define these values much, just understand the static vs dynamic distinction and set it appropriately for each class.
Tunneling
Tunneling refers to bugs where moving objects can punch through other objects without the expected collision behavior. If you notice this happening for a given object class, you can set its fast_move_steps property to something greater than 0 to make its collision checks more granular - basically, each move is subdivided into fast_move_steps steps, the object stops moving if a collision is found, and the collision resolution phase that happens later will push the colliding object out of what it hit. This is enabled by default for the game_util_objects.Projectile class. Playscii's collision code is still maturing so if you see collision problems you can't easily fix, please file a bug.
Sound and Music Playback
Playscii's audio capabilities are not extensive but they should cover basic uses. Sound assets can be in any format supported by SDL2_mixer, and go in the sounds/ subfolder of your game folder.
GameObject.play_sound plays a sound by name, and names are mapped to asset filenames in an object's sound_filenames dictionary. Sounds can play N times or loop indefinitely, and you can stop them by name with stop_sound. You can also define looping sounds to play while an object is in a given state via looping_state_sounds
Music is controlled globally with GameWorld.play_music / stop_music.
Handling Input
Playscii's InputLord class handles application input and takes care of basic things like player movement, but you may want to have objects (the player, most commonly) handle input directly. In these cases, set the class's handle_key_events and/or handle_mouse_events properties to True, and override GameObject's handle_key_down/handle_key_up and/or clicked/unclicked functions. InputLord passes in the key as a string and modifier key statues as booleans, so you don't need to worry about decoding from SDL2 keycodes or anything. Mouse events are passed in as button numbers and give the world coordinates of the click (X and Y axes).
the Developer Console
Playscii has a powerful developer console that can be opened by pressing ~ aka the tilde key, whose placement may vary on non-US layouts. If it's something unreasonable on your keyboard, you can rebind it to something better in your binds.cfg.
Type help at the dev console to see a list of available commands, with a brief summary of what each does. Some of these are more germane to Art Mode and/or redundant with functionality available from menus. Some commands require arguments after them; if so a usage hint will display if you type the command sans arguments.
The dev console can also run arbitrary python expressions within the application's namespace! This is very powerful and potentially dangerous, so save your work before experimenting. The console's execution mechanism sets a few values so you can easily access them:
- app - the application instance itself
- ui - the application's top-level UI instance
- camera - the current camera (Art Mode and Game Mode each have their own camera)
- art - the current active Art in Art Mode
- world - the GameWorld instance
- player - the player instance in Game Mode
- sel - the selected object in Game Mode, if only a single object is selected
- hud - the GameWorld's GameHUD instance
An example of how one might use this: select an object in Game Mode, open the console and type sel.art.set_tile_at(0, 0, 0, 0, 1 + 3, 4, 5). This will set the top left tile of the selected object's current Art to a specific character and color. That particular function is a bit wordy to call, but it demonstrates that you can call actual functions, use expressions, and set values directly from the console. The better you know Playscii's internals, the more powerful this tool can be for debugging and quick hacks.
Crash/Error Handling
As you're iterating on game code, it's possible your code will cause Playscii to crash. Since 0.8.1, where possible Playscii will try to catch this and print the Python exception information to the console instead of crashing. If you run into a situation where this reasonably should have happened but you got a crash instead, please file a bug.
Workflow
If you've been reading this document sequentially most of this will have been covered already, but I hope it's clear by now that Playscii's design places a high value on making it so you can "live edit" and see changes reflected immediately as much as possible, avoiding the productivity and morale drags of having to restart the application or game every time a small change is made.
A proficient Playscii workflow includes using state save files to rapidly reset after code changes, exposing important class tuning values for live property editing, and using the dev console when other UI doesn't easily expose things. Also worth mentioning is that any changes made to Arts that objects reference in Art Mode will be reflected instantly back in Game Mode, so you can iterate rapidly on art and animation assets.
I'm always looking to make this workflow better, so please send me any suggestions you have.
Tour of Example Games
Playscii includes some example games to demonstrate many of the features available in Game Mode, so here's a summary of the learning value of each. In addition the first released Playscii game, Endless Ladder Climbing 2, was created with an older version of Playscii but also does some reasonably ambitious things, so you can download that and examine the scripts/ folder in its game folder if you're eager to learn more.
Cronotest
No real "game" to it, this was the first test space for Game Mode made in April-May of 2015, and shows off what was new at the time: bitmap image conversion from a certain beloved 1990s JRPG, a Player class that uses facing to drive front/side/back view stand and walk state animations, and basic examples of circle (player and the urn), box (the chest), and tile (room walls, bed, stair railing) collision types.
Maze
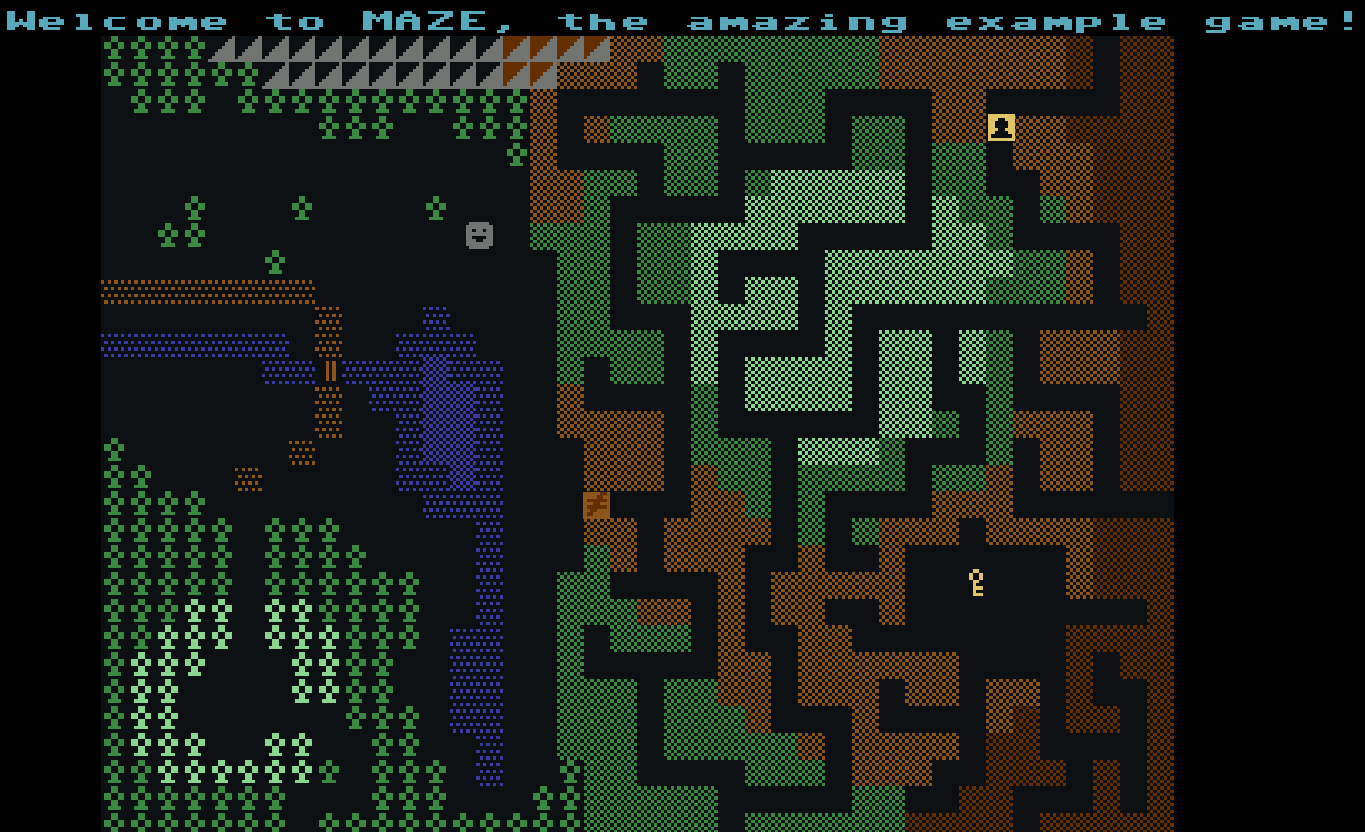
This game was built to put the Rooms features through their paces. Its world consists of several large tile-based background objects, a few pickups, and some very basic NPCs spawned by ObjectSpawners - all collected into different rooms and connected by a combination of "edge warps" and conventional WarpTriggers. It was made with Playscii 0.7.1 in October 2015 and I made a video detailing its features.
Flood
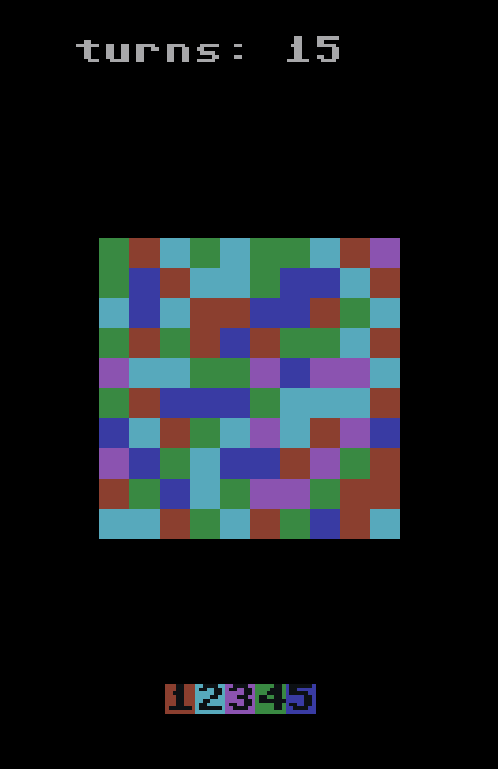
The goal of this game is to "flood" all the tiles with the same color, starting with the top left tile, before you run out of turns. Press number keys 1-5 to choose the next color to flood squares adjacent to the ones you've already flooded.
This game is a simple example of direct input handling - there's no actual Player object spawned, the Board class itself handles input. The Board also directly manipulates the tiles of its own, dynamically-generated Art - notice there are no pre-authored .PSCI files in the game's folder. Setting GameObject.generate_art to True tells the object not to worry about having an art_src set.
Shmup
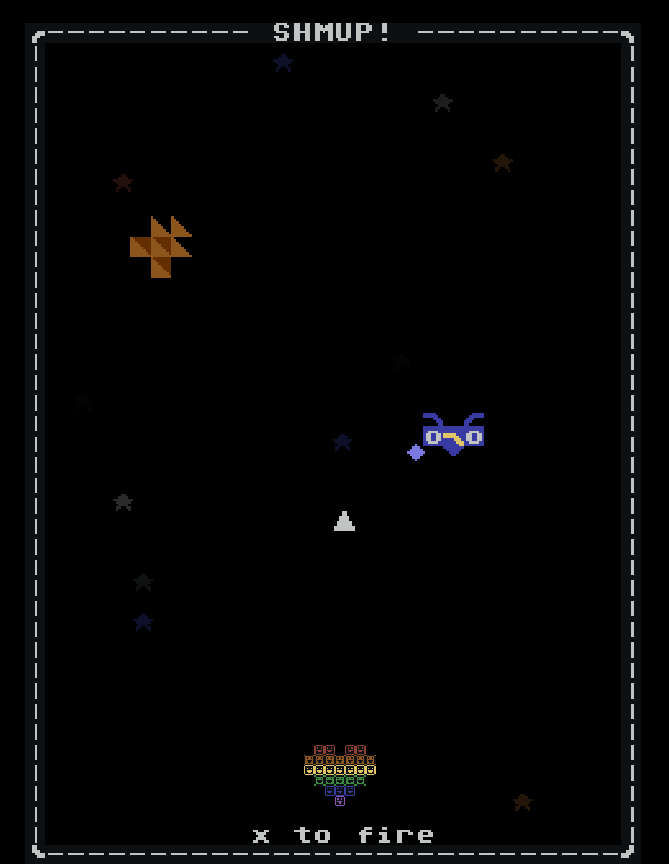
A simple 2D shoot-em-up to show off Projectiles, ObjectSpawners, and a generated starfield. Note how the EnemySpawner class overrides get_spawn_class_name to produce a weighted random enemy population. Various objects use the lifespan property to auto-destroy themselves after a fixed time. The starfield uses Art.shift_all_frames(0, 1) to efficiently scroll downward - under the hood, this uses numpy's ndarray.roll to shift the data without rewriting every tile every update.
Platso
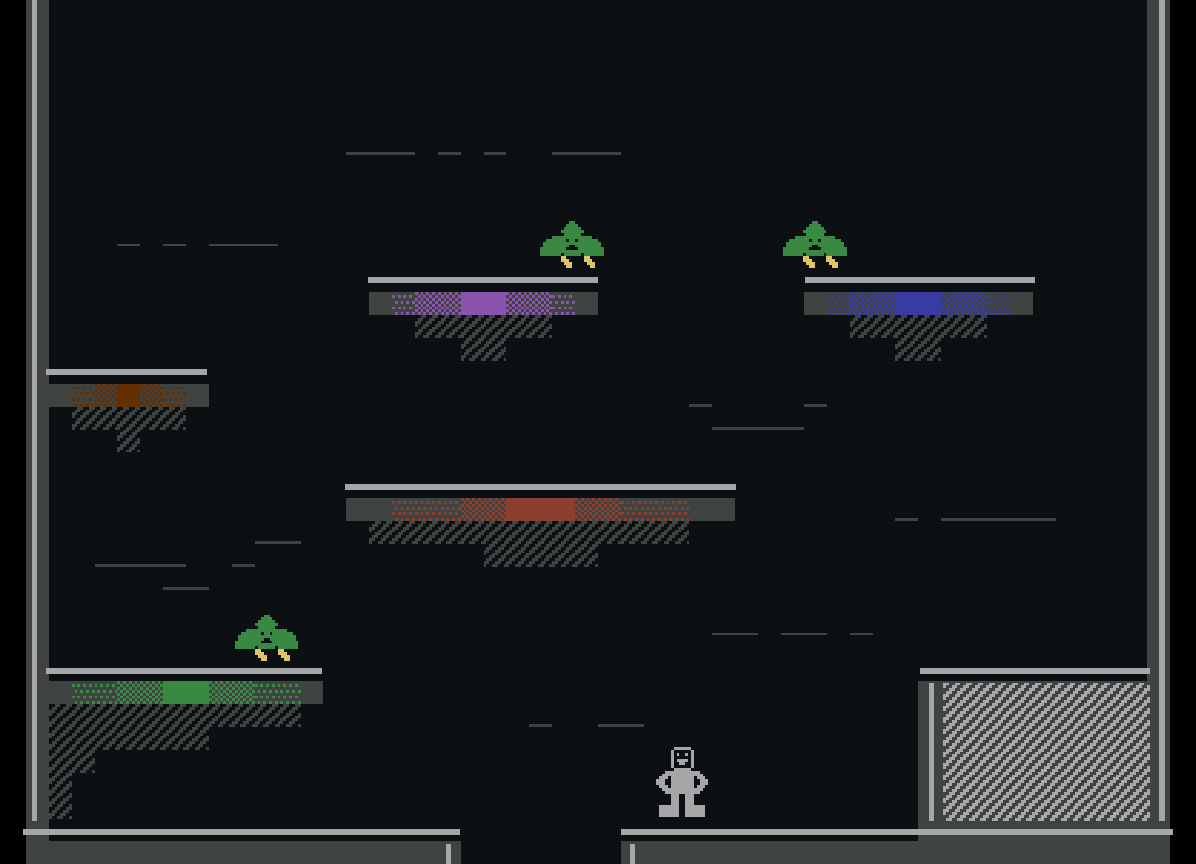
A very basic single-screen platformer featuring a world with gravity and jumping, input handling to ensure each jump requires a keypress, and monsters with some basic behavior logic. Note PlatformMonster's use of set_timer_function to run its check_wall_hits method, a potentially expensive custom collision check, every 1/5 of a second instead of every frame.
Platformers live and die by their control feel and the solidity of their collision resolution and for this game those are definitely not where I'd like them to be, so if you have any suggestions on how to improve it, please let me know!
<< back to main documentation page